"I hope my bag lining is saggy" said no one - ever.
During the testing of The Raelyn Bag Trio, there were some adjustments made for a snug lining. Kassiah mentions and demonstrates in her sew-along video how nice and snug the lining finished. This was a nod to Patricia's patternmaking skills along with our tester group's input.

The Large Raelyn Bag by Kassiah Schern-Meyers
Sometimes, though, it seems like your fabric has a mind of its own, and despite the designer's best intentions, you still struggle getting that great fit.
Following is great advice and tips from the expert bagmakers (who post the bags we drool over), and steps to follow to insure your lining fits the way it was intended by the pattern designer:
REASONS FOR A BAGGY LINING:
- The lining pattern piece is the same size as the exterior piece, and the seam allowances are the same
- The lining pattern piece was cut too large
- The wrong seam allowance was used
- The cotton lining stretched when interfacing was applied by ironing, not pressing
- The lining stretched when turning the bag
- The lining fabric is heavy and "puddles" at the bottom
- An incorrect interfacing/stabilizer was used and the lining doesn't have enough body
- The bag style doesn't necessarily need/require/or allow for a snug lining
Now let's walk through the bag making process to make sure you're doing all you can to insure a snug lining.
1. START WITH THE PATTERN
A well-designed handbag pattern should have pattern pieces and instructions that insure success without a lot of fussing and adjusting. Clear cutting instructions, pattern pieces that fit together well, and seam allowances (SA) indicated for fitting are parts of a good design.

The Colette Bowler Bag's lining is designed to fit well. By Becca Lorraine.
In The Raelyn Bag Trio, the key place for fitting the lining to the exterior bag is in the curved gusset. The gusset is the bottom and side seam allowances for the body of the bag. Patricia allowed for this by first designing the Lining Gusset smaller as noted below.

![]()
The width of the Lining Gusset is 1/2" smaller than the Exterior Gusset. The Exterior Gusset consists of three pieces as an attractive design feature, while the Lining Gusset is only one continuous piece. The width is the important measurement.
The following are the instructions for assembling the Lining Gusset:
. . . Stitch from the top, starting with a 3/8” SA for the first 1” and then increase the SA to ½”, reducing back to 3/8” when you reach that last 1” at the top. This will create a snug fit to the lining.
Provided you have printed the pattern accurately, cut your pieces accurately, and assembled your bag to this point using accurate seam allowances as notated on the pattern, then theoretically your lining should fit beautifully. Note that "accuracy" is a prime consideration throughout.

The structured design of the Penelope Crossbody insures a beautiful snug lining.
Now that we've covered cutting the pattern piece and seam allowances, let's move on to unexpected problems.
2. USING THE INTENDED FABRIC AND INTERFACING OR STABILIZER
A pattern should indicate both the type of fabric and interfacing or stabilizer intended to be used. A beginner bagmaker may possibly substitute for one or both of these with something from their "stash," and expect to get the same result.
Conversely, more experienced bagmakers (generally from trial and error, and lots of practice) know which fabrics and stabilizers will make good substitutions, and how to allow for any differences in behavior.
Inexperienced bag makers frequently make the following mistakes:
- By not being familiar with the properties of the interfacing used, you can change the intended structure of the bag overall. A woven will drape nicely and give your fabric a heavier feel. A non-woven will make your fabric stiff and less likely to conform to the interior as well. Fleece will give a bag more structure, and Peltex will make your bag very structured - and being a non-woven, less likely to conform to being manipulated. This not only applies to the lining, but whether or not you used the appropriate exterior product.
- Not being familiar with how a fabric will behave. Many bags call for a cotton fabric for the lining. Substituting with a heavier fabric, a slinky fabric, or a fabric with some stretch will all affect the outcome.
- Not applying the interfacing correctly. Each manufacturer has specific instructions for each type of interfacing and stabilizer. We all want to hurry up and get to the end result, but taking the time to apply these products correctly is the foundation of a beautifully made bag. If the interfacing bunches, doesn't completely adhere, or detaches when turning the bag, this will immensely affect the finish of the lining.
- Making the mistake of ironing (a bad word in bag making) the interfacing, when you should always PRESS. Even using the correct fabric and the correct interfacing can be ruined by ironing, which can distort the fabric. "Block fusing" is recommended prior to cutting out the pattern pieces. But if not used, it is a good idea to verify the shape and size of your pattern pieces after allowing the pressed items to cool.

In The Laila Weekender, I chose to use a heavy utility ticking fabric, which appears as if the lining is not snug. The weight is pulling the lining down and it is only attached at the zipper facing. By Lisa Stewart
If you have to or choose to substitute a fabric or interfacing, take the time to learn about the properties of each so you will not have surprises with your bag. A great resource for fabrics is this book by Sandra Betzina:

We have a free printable PDF chart of Interfacing and Stabilizers that shows how each performs.

3. CONSIDER THE STYLE , STRUCTURE, AND SIZE OF THE BAG
This has a big impact on the final look of the lining. For example, in The Laila Weekender and The Duffy Bag, both are large, open space bags with the lining only connected at the zipper facing, The linings are designed to fit snugly, but appear baggy when relaxed. The semi-structure may cause the lining to droop from the exterior of the bag. Pull the top up straight and the lining fits.
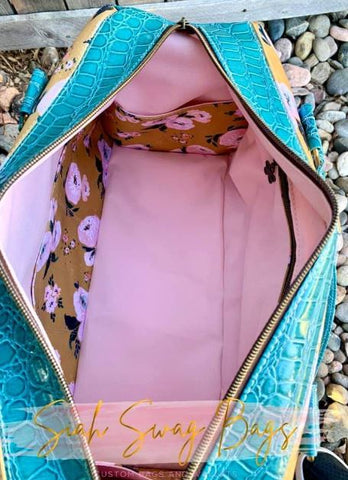
This Duffy Bag by Siah Swag Bags has a good lining fit, but there is still some drooping due to the semi-structure.
A bag such as a bucket style or a large tote bag may not have a snug-appearing lining. Again, the lining may actually be a snug fit, but not when viewing an empty relaxed bag. In the very large Sunset Beach Bag below, I am holding the bag handles to pull it straight up, showing that the lining fits well.

In smaller bags like The Raelyn Bag, The Alyssa Hip Bag, and The Joey Pouch, the linings are easier to snug up due to the smaller interior and the structure of the bag.

A beautiful snug lining in The Alyssa Hip Bag by The Busy Sewing Room
A word of caution when adjusting the lining fit in any bag - the bottom of the lining should fit next to the bottom of the exterior. Having the lining hanging rather than sitting and then filling the bag will put stress on the top seams. At the least, the lining will stretch over time. At the worst, and most likely, the upper seams or fabric will begin to tear, depending on how heavy you load the bag.
- - - - - - - - - - - -
Now that you have the background information, here are the steps necessary for a snug lining:
First: Consider the three "S's" - Style, structure, and size of the bag.
Second: Use the intended materials and if making substitutions, be familiar with both the fabric and interfacing properties and what to expect.
Third: Press, don't iron, when fusing interfacing. Verify pattern piece sizes after applying. The absolute best way to insure that your pattern pieces don't distort is to block fuse your fabric BEFORE cutting out. Distortions or shrinking then happen before you cut your pattern piece.
FOURTH: And with all things related to bag making - your skills will improve as you get more experience. Practice, practice, practice!
Two final tips for those who REALLY want a snug lining.
- Before sewing your lining closed, verify that the fit is as you want it. If you want it to fit more snugly, note where you need to add to the seam allowance and turn the lining out and adjust. Remember to have the bottom rest on the exterior bottom.
- For large bags, you can hand tack at the bottom seam allowances, and maybe other in-seam areas to hold the lining in place. First verify that you have the fit you want, then close any lining openings, and hand tack last of all.
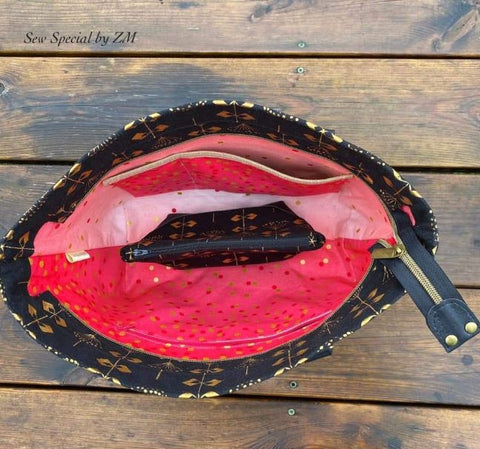
Zeiba Monod's Cici Tote Bag has a nice snug lining and it sits on the bottom as it should
Print out this article and keep it close to your cutting and ironing tables. With careful attention to the details and as you make more bags, you'll soon be posting drool-worthy lining photos!
- - - - - - - - -
Want more learning tutorials like this? Check out our LEARNING LIBRARY.
This article is excellent! All your tips are spot on. I’ve been bagmaking for about 10 years (and sewing in general for 55!), and you’ve done a real service to bagmakers here. Thank you so much!