Add-ons Give The Cici Tote Bag So Much Versatility
Let's turn The Cici Tote Bag into a poolside bag - or a diaper bag. This tutorial will walk you through the changes you can make to the pattern to add extra interior and exterior pockets, and a key holder. And to make the original classy bag more beach or pool friendly, change up the straps and the overlay. A free downloadable PDF with all the changes to fabric requirements, measurements, and pictures along with the full details can be accessed here. Print it off and add to the pattern.
FABRIC AND INTERFACING CUTTING:
Exterior accent fabric:
- I modified the OVERLAY to be straight as I was using outdoor canvas, which would fray on the edges if left unfinished. You could modify the exterior panel measurements and seam the straight-cut overlay, but I preferred the following method for ease and adding some body. I eliminated the curve, and placed the pattern piece on the fold of the fabric. I then cut two overlays, interfaced with SF101, and pressed in half, giving me a nice edge for top-stitching.


- The STRAPS were modified to eliminate the STRAP CONNECTORS and the use of hardware, in case they would be affected by salt air or pool chlorine. The strap length needed is 41 inches, allowing for an 11 inch drop. I am 5'2" and this allows me to carry the bag by hand and it doesn't drag on the ground. The outdoor canvas is a little floppy, so I added 2" wide SF101 down the middle of the straps for a little structure and because the fabric tends to stretch a little. I stitched an "X" box for security. There is also 2" square pieces of Pellon Peltex behind the "X" area for more stability.

- I eliminated the ADJUSTABLE STRAP and SIDE CONNECTORS.
Exterior main fabric:
- All exterior pieces are cut as stated in the Cici Tote Bag pattern. The main panels are interfaced with SF101, and I then added fleece to give the bag some structure. (Edited on 9/28/21: I have found that the fleece does not give the top of the bag enough structure and it tends to curl in. Keep this in mind and either use a firmer stabilizer such as foam or Peltex OR stitch the straps all the way to the top edge.)
- I added two slip pockets - one on either side of the bag, with a measurement of 7" x 13" folded to 7" x 6 1/2". After the overlay and straps have been added, the pocket finishes at 6" x 5 1/2". Because this was outdoor canvas and the pockets are snug behind the straps and the overlay, I did not use interfacing on these pieces. I fussy cut my pockets. You could add pocket trim if desired, or a magnetic snap.


Lining fabric:
Note: If you use all of the add-ons as shown, you will need additional fabric, which is noted in the PDF.
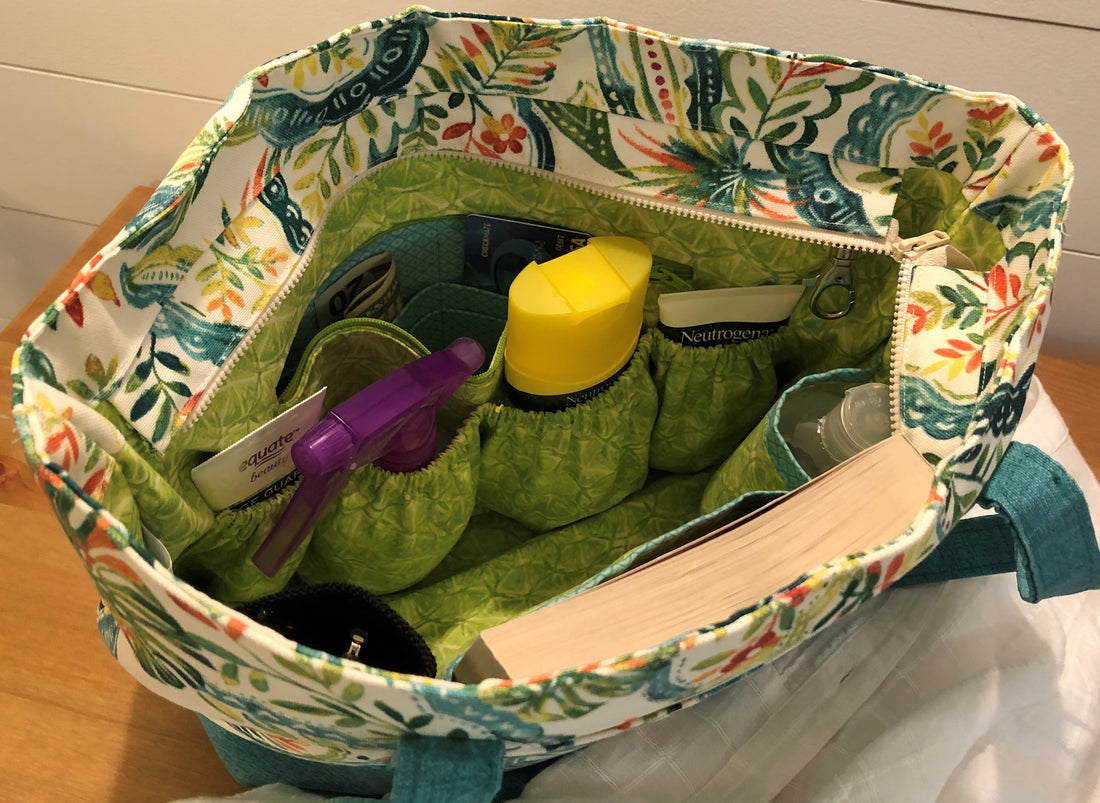
- Instead of the SLIP POCKET used in the pattern, a larger sectioned slip pocket can be added with measurements of 18" x 13", which finishes at 18" x 6". After making the pocket, it is sectioned by top-stitching vertical lines to your preferences. The pocket is enclosed in the side seams. I trimmed the top edge of my pocket. The beginning of the stitched lines can be seen in the trim in the photo.

- The ZIPPER POCKET can include card slots to eliminate carrying a purse or wallet. The LARGE ZIPPER POCKET pattern piece is substituted with a new piece measuring 11" x 15" and interfaced with a layer of 808/809 or 2 layers of SF101. (I ran out of 808/809, so I used two layers of SF101. I personally like how it irons and makes crisp edges better than the 809!) I used a contrasting fabric for this piece. The card slot piece finishes at 11" x 8", the same size as the original LARGE ZIPPER POCKET piece in the pattern. The zipper pocket is then sewn the same as the pattern states.

- A large elastic top slip pocket was added in front of the zipper pocket to hold tanning lotion, small water bottles, etc. This piece measures 23" x 13" and then folded in half lengthwise and stitched to create a 23" x 6" pocket. A 16 inch piece of 3/8" elastic is used for gathering the top. The sides are set in 2" from each edge and folded under 1/2" and stitched down. The bottom edges are formed with 1/2" pleats to take up the slack fabric. I did this by just working with the fabric as the gathers made natural folds. I ended up with 4 sets of 2 pleats. After stitching the bottom in place and securing the pleats, I then eyeballed my pocket sizes and stitched vertical lines to make sections. Tucking that zipper pocket up out of the way is crucial! The slip pocket and gathered pocket could be used on either side of the interior.


- I added a key holder near the zipper pocket. This 1" x 3" piece can be cut from whatever fabric you desire. I used the accent fabric as it is sturdier than the cotton lining. It is lined up with the upper raw edge and is secured when the zipper placket is attached.

Notice the curling top edge as mentioned earlier
You can access the free PDF file The Cici Tote Add-on which includes all the changes and additions made to the pattern! This is only the add-on instructions, the Cici Tote Pattern would still need to be purchased to make the bag.

- - - - - - - - -