Beginning Bag Making Without Tears
I have been sewing for decades. Clothing, lined draperies, elaborate costumes, quilts, home decor items, etc. And I have made simple lined tote bags - all cotton fabric, no zippers, or snaps. At the encouragement of a seasoned bag maker and instructor, I decided to take on a multi-featured tote bag. I felt like such a dummy - just ironing on the Peltex. My self-talk went like this: "Why wouldn't it stick? Was prepping the bag supposed to be so hard - and take so long? And why did I pick such a thick fabric?" With the interior, the exterior, the multiple layers of interfacing, and the thick seams, blah, blah, blah - I just knew it was going to be such a mess. My bag maker friend said, "You'll have it done in one day." Uh, no.
In the end, it turned out okay. I'm not ashamed to carry it. But, I learned ALOT along the way, and continue to learn as I wade into the world of bag making. By no means am I trying to discourage anyone from challenging themselves. But for many of us, baby steps are the way to go as we build our skills and confidence. If you are on your way to becoming a "bagineer," these tips will help you have a less bumpy ride.
Choose A Pattern Appropriate to Your Bag Making Level
Even an accomplished garment or decor sewist may need to start as a beginner in order to get familiar with bag making lingo and techniques. Be sure to read through the pattern description before purchasing, and study the accompanying photo(s). For your first project, a large tote bag may be more suitable than a small crossbody bag. Here is the skill synopsis for The Cici Too Cosmetic Bag:

(A Confident Beginner knows how to use a sewing machine and basic sewing terminology).
Choose a Fabric You Are Comfortable Using
Pattern designers list the fabrics that they deem appropriate for the design. The instructions are based on using those fabrics. If you are comfortable sewing with cork or vinyl, then by all means try it on a bag. However, if you are not familiar with those products and you are attempting a bag for the first time, you may want to stay with cotton. This way you can learn the actual bag making skills and not get bogged down in the machine settings, needles, and possible topstitching challenges you may face with an unknown fabric. Here are fabric recommendations for The Cici Tote Bag (not necessarily appropriate for the first time bag maker):
EXTERIOR FABRIC:
- ½ yard quilt weight cotton, canvas, home décor fabric, or similar. If using a directional print, you may need more fabric.
- 3/4 yard x minimum 31” wide of vinyl/faux leather, cork, leather, or similar. If your fabric is not as wide, you will need to adjust accordingly depending on where you plan to use this fabric.
LINING FABRIC:
- ½ yard x 54” quilt weight cotton, canvas, or similar weight
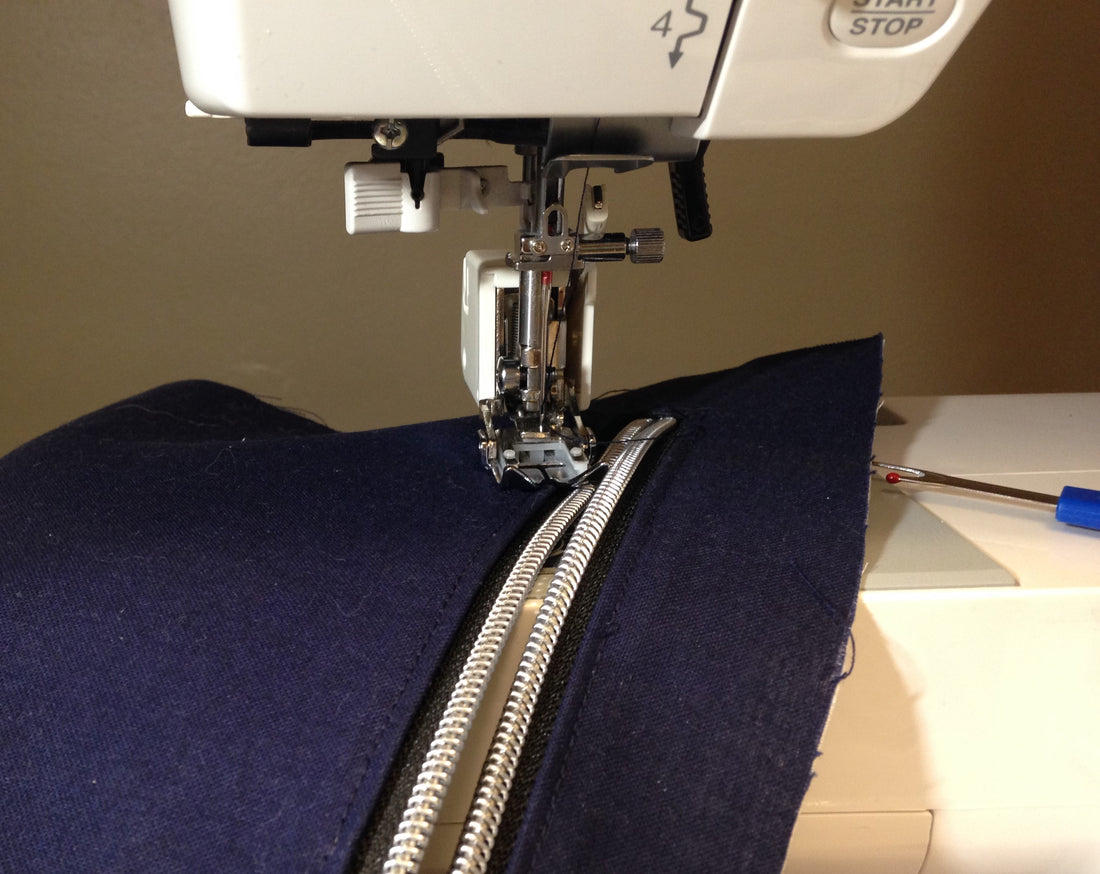
Consider a Pattern With Very Little Hardware
Maybe you are already proficient with inserting zippers in clothing. But inserting a zipper in a bag, particularly a top zipper, may be more of a challenge. And an exterior zipper pocket is going to be a focal point, so you'll want to make sure your skills are well-honed. Adding strap connectors can involve top stitching thick layers, even when using cotton. Hardware is the "bling" of your bag, and you don't want sloppy workmanship to detract from their appeal. Here is various hardware on The Claire Shoulder Bag:

ALWAYS Read Completely Through the Pattern Before Beginning
Every bag pattern (and garment pattern) I have ever used says to do this. It's not a suggestion - it's a necessity. You want to make sure you understand all the techniques the particular designer is using and how it all goes together. You'll know how to prep your material, any particular marking you should do, and have clarity in how the bag is put together. This gives you an opportunity to ask the designer or someone else how to do something instead of being in the middle of your project. Everyone was a beginner at some time - there is a whole community ready to help you - just ask!

Follow the Manufacturer's Instructions for Applying Interfacing
Don't rush this part! Interfacing is the foundation of your bag and if you do a sloppy job, it WILL show up. If the directions state DO NOT USE STEAM, do not steam as it may bubble, wrinkle, or shrink the interfacing. Depending on your iron, sometimes it takes a little longer to adhere the thicker interfacings. Pay attention that you have placed the shiny or bumpy side down on the wrong side of your fabric. And if directed to do so on the pattern, make sure that the interfacing is not in the seam allowances.
Make Sure Your Machine is Clean and Insert a New Needle
Some designers recommend a Microtex needle as it is super sharp and will pierce multiple layers easily. Also, a walking foot can be useful in moving along those thick layers or fabrics that want to grab. Cleaning out the bobbin area is a must. Anything you can do ahead of starting your project will help you avoid one more interruption or frustration.
Practice sewing on scraps of your fabric layered with interfacing to set your tension and stitch length. A stitch length of 2.5 to 3 mm is appropriate, and you'll be happy you used it if you have to unpick.
Invest in Some Wonder Clips (or an equivalent)
Clips keep your layers of fabric flat. You have to remove them as you sew - impossible to sew over. (You may still use pins on thinner layers, like an interior slip pocket assembly.) Here, on The Penelope Crossbody Bag joining the body and gusset, the clips hold the curves nice and flat prior to sewing:

Reinforce Stitching at Curves and Corners Before Clipping
You're going to be clipping those corners and curves. What a shame to snip right through your one line of stitching. Take the time to do it twice and then clip CAREFULLY. I always hated doing this on collars and pillows, until I clipped through and had to deal with sewing on a ragged edge. It is insurance before clipping and worth the few seconds it takes.
Learn to Use the Proper Tool for Pushing Out a Corner
That double stitching will help here, in addition to cutting the corner diagonally. But if you use the wrong tool, you can tear your fabric. Patricia recommends a chop stick. You'll also be using your fingers to work the corner from the outside so you get a nice crisp turn. Don't keep jabbing!
I have this bamboo point turner and presser. Besides helping with the corner, the rounded edge can be used for pressing down a seam, and the pointed end for pushing down a fabric edge under the presser foot.

Use Steam for Pressing and Shaping Your Bag
This is the final and last step when making a bag. It really makes the difference between having a "homemade" bag and a "handmade" bag. Using a Tailor's Ham and/or a Seam Roll, can be very useful. Also, rolling up a towel to insert into your bag. Steam (used on cotton fabric) will help "stretch" the fabric to shape your bag. However, use carefully as reactivating the adhesive on any interfacings or stabilizers can cause them to move and lift. You've worked really hard to this point - take your time in giving it that final press.
Cork, vinyl, and faux leather would have different needs for pressing and should be explored before doing so. DO NOT steam or apply direct heat on any of these fabrics.
Do you have any tips to share with bag makers of any level? Comment below or join the FB Group!
Whether you are a beginner or an expert bag maker, we'd love to have you join our Facebook Pattern Group. Ask questions, give guidance and encouragement, share your makes. Patricia is always quick to answer questions, and loves your feedback.
Please feel free to comment, but be aware that Shopify doesn't offer a way for us to respond. If you have any questions, please PM through Facebook, or email us at kayapapayadesign@gmail.com. We'd love to hear from you!
3 comments
I appreciate all these great learning articles. They are very helpful.
Even though I grew up sewing garments with my mother there are still so many different techniques to learn about bag making.
Thank you SO very much for your great beginner articles
Sincerely,
Carole S.
Thank you for your wonderful patterns and great tips. Thank you also for letting tutorials be made by sewers on YouTube.