Let's "Hack" The Bailey for a Dressed-Up Look
I like using cotton fabric in my bags. Quilting, linen, canvas - I have sewn on these for years and am most comfortable with them. I also just like the look.
Many beginning bagmakers are the same, or may be intimidated by using vinyl or feel that their machine isn't up to the task. The patterns in The Beginner Basics Collection are designed for cotton as
- it's a familiar, easier fabric to work with
- it let's the bagmaker focus on learning assembly skills
- it achieves the look they intended with greater success

Jaime Casselbury pieced and quilted the accent panel on The Bailey
As with any pattern, the bagmaker is free to choose whatever material they desire, and unless noted in the pattern, the bagmaker needs to adjust interfacings, measurements, and techniques particular to that material.
- - - - - - - - - - - -
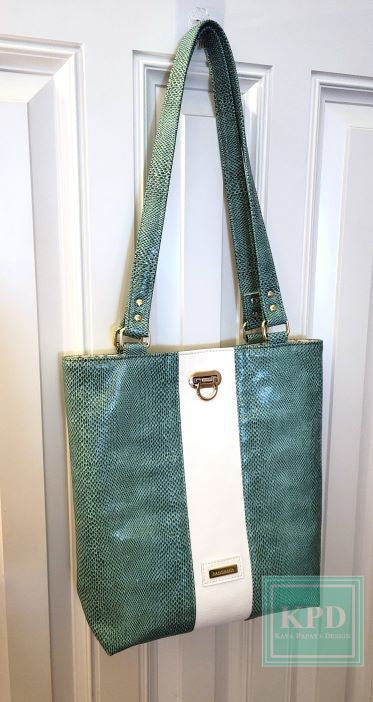
Patricia loves to work with vinyl (and one day will take a deep breath and cut that gorgeous piece of real leather). She loves the upscale designer look and appreciates the faux skins and textured looks that are available.
The Bailey Basic Tote is the perfect pattern to whip something up quickly, use some hardware bling from your stash, and have a classy tote bag in just a few hours. There's not a lot of details in the bag design, so the vinyl and hardware really shine.

Let's go over the details for the "hacks" she made to the pattern so you can achieve the same look. Only the changes are noted, so everything else stays the same. (I've noted the page number of the pattern). And feel free to print this article to add to your pattern. You will need to own The Bailey Basic Tote in order to incorporate these changes to the pattern.
FABRIC, INTERFACING, AND NOTIONS (page 5):
- Vinyl (pictured is from Bo Dee-Oh) for the exterior, straps and connectors, accent strip, and slip pocket trim
- If your vinyl is thick, you can eliminate all SF101 for any exterior pieces, straps, and accent strip. You will not interface the pocket trim.
- Peltex scrap (or equivalent) for "male" part of flip-lock/turn-lock
- Metal tag with prongs
- Flip-lock/turn-lock instead of the magnetic snap
- (4) 1" square rings
- 4 - 8 Medium size rivets
- Fray Check for flip-lock/turn-lock opening edges (optional)
- Edge Kote for raw vinyl BACKING for metal tag and/or STRAP ends (optional)
FABRIC AND INTERFACING CUT CHART (page 6) and PATTERN PIECE LABELS (page 8):
- No SF101 for EXTERIOR BODY and ACCENT STRIP (unless vinyl is thin)
- EXTERIOR BODY STABILIZER Fleece will be used (no change)
- Eliminate pattern pieces D & E and instead cut (2) STRAPS at 4" x 30". This will make a 13" drop with a 2" fold back at each end connecting to the square rings. Adjust to your preference. No interfacing needed.
- Add (4) STRAP CONNECTORS at 3" x 2". No interfacing needed.
- Add (1) BACKING for the metal tag at 1" x 2" or as needed depending on tag used. No interfacing needed.
- Add (2) SLIP POCKET TRIM pieces at 3/4" x 10". No interfacing needed.
PREPARATION (page 9):
1: Only the LINING BODY and both POCKETS will have SF101 fused (unless vinyl being used for the exterior is thin).
2: Same
3: Ignore the magnetic snap instructions. Change the measurement from the top edge to 1-7/8" for the center of the flip-lock. Designate which piece will be the back lining piece and fuse a scrap of Peltex on the WS of the LINING BODY piece centered over the dot. You may need to mark the dot on the Peltex after.
4: Ignore
5: Same
Add STEP 6: Prepare the ACCENT STRIP:
1. On the RS, using a removeable marker place a dot 4-1/2" up from the bottom edge and centered. This is the bottom of the BACKING for the metal tag. Center the BACKING and top stitch 1/8" from the edges. You may want to prep the edges with Edge Kote prior to adding. Allow to dry before attaching.
Add the metal tag to the BACKING piece on the ACCENT STRIP. For getting the tag "just right" refer to this blog post.

2. From the top edge, measure down 1-7/8" centered and mark. This is the center of the flip-lock "female" part. No photo.
PREPARE THE STRAPS AND STRAP CONNECTORS (page 10):
Prepare the STRAP CONNECTORS first:
1: Lay WS up and mark the center lengthwise.

Note: this piece is not interfaced - the vinyl has a thick backing
2: Fold the long edges WST to the center line and press.

3: Top-stitch the long edges at 1/8".

4: Fold over the square ring and baste the ends together. Set aside.

For the STRAPS:
STEPS 1 - 5: Ignore
New steps:
1: Lay the STRAPS WS up and mark the center lengthwise. Place DST on either side of the line and remove the tape backing.

2: Fold the long edges WST to the center line and finger press in place.

3: Fold the long edges together and clip. Follow the instructions in STEP 5 for top-stitching.

SEW THE EXTERIOR BODY BACK SEAM AND ADD THE STRAPS (page 14):
The STRAP CONNECTORS are used in place of the STRAPS in STEP 4. The STRAPS will be added to the square rings at the end of the bag construction.

MAKE THE LINING TABLET POCKET AND THE LINING SLIP POCKET (page 16):
The pockets are sewn a little differently in order to add the SLIP POCKET TRIM. Use these STEPS instead.
1: Fold the LINING TABLET POCKET RST matching short ends and clip in place. Starting at the bottom folded edge, stitch 3/8" SA to the top opening on each side, being sure to backstitch at beginning and end. You WILL NOT be pivoting at the corners to leave the top section open for turning.

2: Clip the bottom corners, turn the pocket RS out, and carefully work the corners. Press the pocket.
3: Lay one of the SLIP POCKET TRIM pieces WS up. Draw a line lengthwise down the middle. Run a line of fabric glue below the drawn line and lay the pocket back side down, lining up the raw edge with the drawn line.

4: Add glue to the other side of the line and fold the TRIM over to the front of the pocket and clip in place. The TRIM piece should extend past each end. Top-stitch at 1/4". Trim the ends even with the pocket.

5: With a removeable fabric marker, mark the center of the top edge of the pocket.
6: Repeat STEPS 1 - 5 above with the LINING SLIP POCKET.
ADD THE POCKETS TO THE LINING BODIES (page 17):
The LINING TABLET POCKET is to be placed on the front LINING BODY piece (the piece WITHOUT the Peltex fused to the back). The "female" part of the flip-lock will be installed above it, and this will prevent the "male" part from interfering with the tablet insertion. Ignoring all references to the magnetic snap, follow all instructions on page 17.
Then add this step to install the "male" part of the flip-lock:
On the LINING BODY piece WITH the scrap of Peltex (and small divided slip pocket) WS, center the flip-lock template over the dot and mark the slit lines. Cut the lines carefully through the SF101 and the LINING fabric. Install the "male" part of the flip-lock from the RS of the LINING piece, making sure the prongs are flat. If desired, add duct tape or interfacing over the prongs for extra protection. (The picture is for reference as to where the flip-lock goes in relation to the pockets - not to show the bag at this point in the process).

After completing the bag, you will add the "female" part of the flip-lock.
Add the "female" part to the Accent Piece and lining. Reference this excerpt from The Edyn Handbag for complete instructions and pictures. Note that adding a turn-lock and a flip-lock are the same.

You're almost done. Now it's time to add the STRAPS to the square rings.
1.Take a STRAP and fold it over 2" and clip in place. Stitch if desired or install rivets.
2. At 3/4" above the square ring, install a rivet. Space the 2nd rivet 3/4" above that.

3. Take the other end of the STRAP, making sure it is not twisted, and do the same with the other end on the same side of the bag.
4. Install the second STRAP on the other side.

And there you have it - a dressed up basic tote!
Ready to step up your bagmaking skills with a simple pattern?
